How to Self-Maintain Your Laptop
Dec 17,2022 | OnSmart
Maintaining your laptop is a mandatory action that you have to do periodically in order to keep it in prime condition. You can bring it to the official/authorized service center if it's available in the town. Alternatively, you can also do it yourself in case you can't find a trustworthy place, are in an emergency situation, or are in money-saving mode.
DISCLAIMER!!!
- This act of self-service is only applicable for simple issues,
- This act of self-service may only be executed by an experienced computer user,
- This tips is not appliable if your laptop got an issue from any spilled liquid (such as: drinks, drenched, etc),
- If the warranty is still valid, we recommend you bring it to the official/authorized service center or any professional, and
- You may proceed at your own risk.
So, here are some tips that you can follow to self-maintain your laptop.
1. Prepare the Tools
First of all, you need to prepare the proper tools before you disassemble things. Most of the tools are kind of easy to find on general store.
| Main tools: | Additional tools: |
|
|
2. Learn How to Dissassemble Your Laptop
We are in an age where information can be easily accessed. First things first, all you need to know is your laptop model. Usually, a laptop model can be identified by a sticker or printed text under your laptop.
The next step is to find the disassembly video of your laptop model on YouTube. You can simply type "<Brand name> <model code number> disassembly" (for example: HP 13-be0000AU disassembly) on the search query.
The search result will show you the related disassembly video, whether it is from the official brand or from other content creators. Just follow the step with the tools that you've prepared before, pull out the plugged cables with care by using tweezers, take out the necessary components (example: HDD, RAM, heatsink, fan, etc.), and you are ready to proceed to the next step.
3. It's Self-Maintain Time!
After you have successfully disassembled your laptop, you can start by brushing off the piles of dust. You may also use a blower to remove the tiny debris. After that, use a mini vacuum to collect the scattered dust.
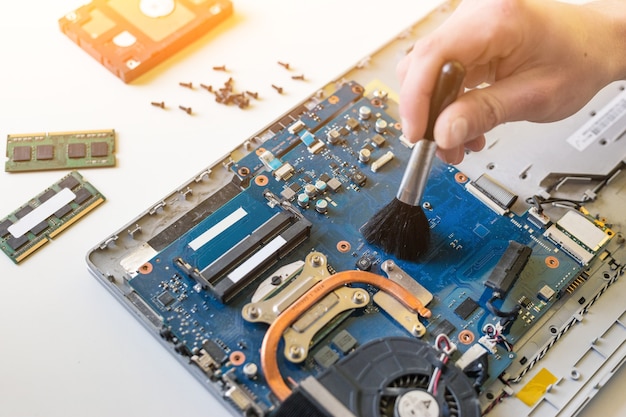
If the dust is kind of sticky, you may apply isopropyl alcohol to cotton or cotton buds, then rub it on the designated spot.

The next part is an additional matter, which is to re-apply the thermal paste on the CPU chip. You can perform this kind of maintenance in case it is necessary to clean up the heatsink or if the thermal paste has dried up. Before we do that, make sure that you clean up the residue of the thermal paste on the heatsink and on the CPU chip. Usually, a heatsink component is connected to the fan.
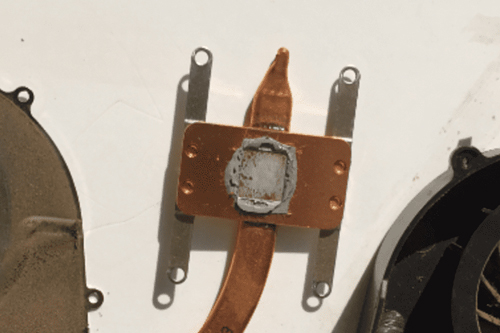
As you can see, there is a thermal paste residue (the grayish, paste-like thing) on the bronze-plated metal. To clean it up, you can simply apply isopropyl alcohol to a lump of cotton and rub it until it's clean. The same thing applies to cleaning the CPU chip as well.
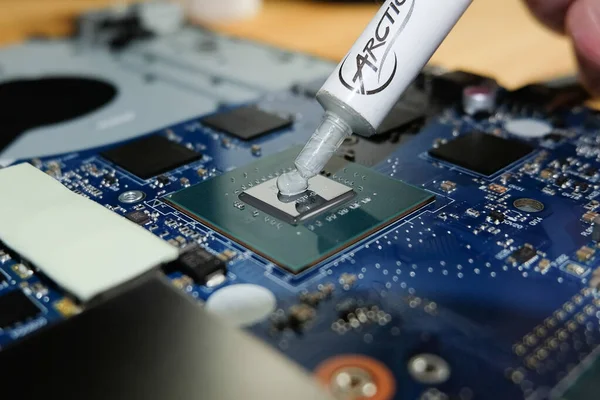
After cleaning up the heatsink and the CPU counterpart, you can apply the thermal paste in the right amount to the CPU chip. You can also make it even on the chip surface with a spatula that is usually provided by the thermal paste manufacturer.
4. Reassemble Your Laptop Again!
Finally, the last part! Do you still remember the step of disassembling? Now it's time to reverse it. Let's put all components back in their initial positions, re-plug the cables, and don't forget to screw back the casing.
Congratulations! You're all set! See, it's not really that hard, right? Then it's time to turn on your laptop again to see if it works and see you again on the next article!
Comment

